Contact...
Posted on
Contact.
I often come across riders claiming their horse “leans”, is “heavy”, won’t “accept the contact”, “throws its head around on a free rein” and so on.
The reaction often given by the rider is to hold the reins tighter, pull on the “heavy rein” to “get the horse off it”, sometimes even “jab” the horse in the mouth in an effort to stop the horse from doing all the above.
Obviously, this may cause the horse to react in the short term, but you are only treating the symptoms, not the cause, and more obviously it is not right to cause pain to stop the problem!
To begin to correct the problem, first you have to identify the cause which may be coming from a pain related issue, so as with all issues, it is always a good idea to get your horse checked over for any physical problems, including tack fit, also paying attention to your own riding style and position.
So, let’s begin with the rider, as a lot of issues can be ironed out by sorting out the rider!
Quiet Hands.
We all strive for soft quiet hands, but without a balanced secure seat, your arms and therefore hands, are bound to move and be uncontrollable.
It is well worth enlisting the help of an instructor to give you some lunge lessons, that way you can focus on developing your seat and balance, therefore improving your arm and hand control.
Hand and Arm Positioning.
We have covered overall body positioning in previous categories, so won’t go over old ground, here we specifically look at the arm and hands.
The whole arm up to and including the shoulder should remain soft, allowing and following. 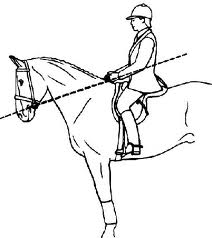
The elbow is where the rein should stop! This means that the lower arm becomes an extension on the rein, rather than finishing at the wrist as I so often see.
The hand is where the rein threads through and the fingers close around the rein sufficiently to keep hold of the rein, but not gripping. Think of holding on to a baby bird, you want to hold it but not let it fly away or the opposite would be to crush it.
The position of the hand should be with the thumbs facing upwards, not inwards (pram pushing hands), there is good reason for this, not just so it looks pretty!
There are 2 bones in your forearm, when your thumbs are “on top” these bones lie parallel to each other creating a soft and more moveable hand and arm, when your hands are “pram pushing”, the bones cross over and lock into position, creating tension.
Here is a diagram to show these bones: 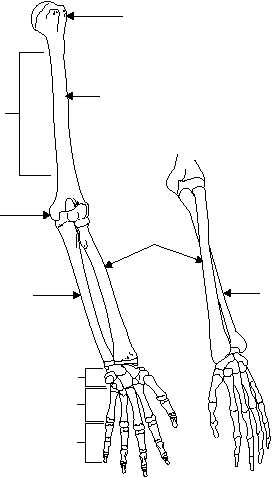
The Contact to the bit
The contact provided to the horse’s mouth via the hands, should be a consistent, following and elastic one, very much like the reins are made from a strong elastic, providing support but with give.
Very often seen are two opposite ends of this scale, loose, inconsistent reins and hard pulling reins.
The rider who has an inconsistent rein contact very often has a horse who will hollow on contact and then “bounce” on the loose rein (throw his head around), meaning the horse is receiving inconsistent messages, and either backs off the rein once contact is made or lean on it creating a heavy contact.
The other rider who “hangs” on the rein very often does this in an attempt to balance themselves, in which case they would benefit from the lunge lessons mentioned previously. Or, the horse has developed a habit of leaning on the rider in an attempt to stay balanced, therefore when the rider releases the contact the horse falls on his nose or runs faster in an attempt to balance himself, very often I see the rider in these circumstances hold the reins tighter in an attempt to stop the hose either “falling” or “running away”.
Both these faults are not difficult to change, the horse is responding here to the rider, therefore the rider has to be addressed to improve the horse.
Another part to mention here is the use of stronger bits, very often (unfortunately) the rider resorts to using a stronger bit to get a “lighter feel”, yes, it usually has that effect, but this is a truly false contact, the horse is afraid to take the contact therefore will curl back behind the bit, giving a false “outline” (covered later), but all too often thought to be correct.
The correct contact should feel as if the horse is equal to both reins and is “resting” on the bit, not leaning, one sided or “bouncing”. The feel should be consistent and “full”.
What other effects does the rein contact have?
In an attempt to “bend” the horse, riders increasing use more inside rein to “bend” the horse to the inside.
Not only will this inside rein pulling (yes, that is basically what is happening!) not supported by the outside rein and leg aids, meaning the horse “looks” to the inside, but it falls out badly through the outside shoulder in an attempt to escape the “bend”.
The inside rein when used incorrectly blocks the horses inside hindleg, preventing it from stepping underneath and taking the weight and helping balance the horse, if you watch a horse being ridden like this you should notice that each time the rider “bends” the horse with the inside rein the corresponding hind leg almost stops, at which point the rider asks for more with their leg and as an effort to please the horse’s leg becomes more active, but only in a piston like way, i.e. goes up and down quicker rather than stepping under more.
When ridden correctly with the outside aids in place, the inside hind leg will have room to move more underneath him and then the bend can be correctly asked for.
A good rule of thumb is that the outside rein belongs to the rider, the inside rein belongs to the horse.
Outline and “On The Bit”
These two go hand in hand, unfortunately very rarely correctly.
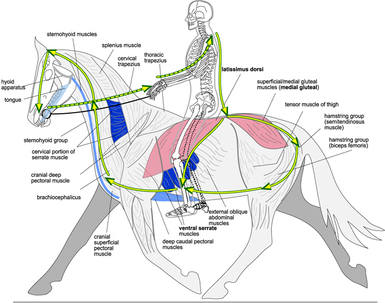
The horse is said to be in an outline when the hindlegs step far enough underneath him to take the weight and balance, therefore lightening the forehand and lifting his back, the neck is out in front of him, with him connected to the bit, showing self carriage.
The following diagram shows the muscles involved in this “circle of muscles”, all needed to create the correct “outline”.
This image shows an incorrect “outline”
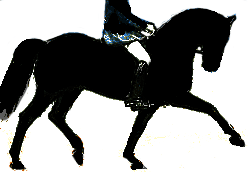
This is incorrect due to the hind legs trailing, the back is low and the horse is being held up in his neck. (Although some have said this is correct!)
The next image is fairly typical of a horse in an incorrect outline, note the poll to the wither muscles fizzle out before they reach the wither, but a largely built area at the poll. I am sure if you could see the hind leg it would be trailing and his back hollow to.
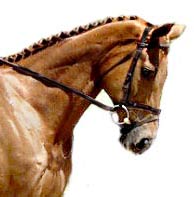
The term “on the bit” is used to describe when a horse is using its whole body as shown in diagram 1, and works over its back into the contact. Unfortunately as the sentence mentions the word “bit” it is here the emphasis is placed by some riders, causing the rider to pull the horses head and neck into a “shape” as seen in the image above.
If you change the wording “to the bit”, this I feel gives you a better mind’s eye of where to look, creating energy from the quarters and sending that energy “to the bit”.
So to achieve an outline that is correct, we have to work the hindquarters FIRST, sending that TO THE BIT where the contact is maintained by the rider.
Making corrections.
I have spoken about the horse who leans, is one sided etc, but how do we correct these?
Well, by now I think you may have noticed that contact is vital, and riding the energy from the quarters to the bit! And we now have worked out how to identify the correct outline, now we need to know how to achieve it.
So, for example, my horse leans on the left rein, falls in, is heavy on my left rein, all these can be addressed by the use of the left leg, NOT the left rein!
A horse who leans on this rein will often leave the opposite rein feeling empty, and in an attempt to correct him, the rider will pull the left rein to try and encourage the horse to “get off it”, in fact all that this creates is more leaning! What needs to be done is for the empty rein to be filled from your left leg.
Keeping your right rein and leg supporting, move onto a circle of approx. 20mtr, begin by guiding your horse round the circle with your OUTSIDE aids, your horse should at this point be equal in both reins and his head straight in front of him, not bent left. Then before asking for any bend ride a few walk trot transitions to begin to engage the hindleg, once the transitions are clear and active, at this point begin asking for a small amount of bend FROM THE LEG, keeping EQUAL pressure on both reins, you might feel like your horse wants to fall out or in, but persevere, keep him STRAIGHT in his neck and keep the hind leg active (remember this is where the bend starts!) once your horse accept this, then you can begin to ask for a small amount of flexion to the left, if he gets heavy or falls in, the left leg needs to support more and push the energy towards the right rein.
Keep going with this until you feel you can “give” the left rein and he stays where you asked him to be with the flexion.
Then and only then can you be sure you have him working from inside leg to outside hand, straight and balanced. This takes time and patience, don’t be quick to stop asking, even if the falling in/out is dramatic, he needs to realise you are there to help him and support him, NOT hold him up!
There are a few other methods I use in training to help with this, but this particular one is 99.99% fool proof, you just have to work at it.
Summary
Contact is not simply about the rein, but the contact throughout the horse’s body. We as riders must aim to achieve a high degree of self control in order for us to be able to be consistent to the rein and therefore provide the horse with an elastic but supportive connection.
We must analyse the way the horse feels, if he is leaning, one sided etc, work to FILL the opposite rein.
On the bit should be thought of more as “to the bit”.
An outline is only correct when the hind quarters are engaged and underneath.
Always look at yourself BEFORE the horse to ensure it is not you causing the problem!
